Friday, June 29, 2012

My Baby is 2!

Why does time fly by faster the older you get?  My baby girl just turned 2!  She's growing so fast.  She learns new things every day and she is just amazing.  


My beautiful baby girl two years ago at two weeks old.  Gosh, she has changed so much!!


Me and Jaidyn at her first birthday party.  We had a big shindig and she loved all the attention from some of her favorite people.


Jaidyn at her first birthday party.


She's all sandy here from playing hard like only a two-year-old can, but here's one of her few smiling pictures, taken just after her birthday.  It's so hard to get this little one to smile for a photo!


This wrapping paper is from target.  I love it paired with a pretty ribbon.  So simple and pretty.


Here's big brother working on his card for Sissy.  He drew a gorgeous picture inside and even wrote her name.  He picked the card out because he knows how much she likes owls.  He's already so thoughtful.  Owl was Jaidyn's first animal word, right after Momma, Dada, and Bubba.


The birthday princess waking up on her special day.  I love that face!


Jaidyn got a LeapPad from mommy and daddy.  Do you think she'll stay off my iPad now?  Yea, I don't think so either.  It's okay though, I love watching her little fingers swipe to find her favorite games and pictures.  The little cutie in the picture is my niece, Ella.


I am so thankful I took time the night before her birthday to set the LeapPad up.  It took about an hour to download all the games and get it set up so she was able to play with it as soon as she opened it.  I don't think she could have waited!  She absolutely loves having her own tablet.  


Even though we didn't do a big birthday party, I had to make her a birthday dress.  I didn't use a pattern or tutorial but I based the dress on some pictures I found on the internet.  The dress is called a knot dress.  If you google it you can find tons of pictures and I'm sure there are tutorials and patterns.


This is Jaidyn's favorite material.  I've made two other dresses with the fabric, one for my niece and one for a customer, and Jaidyn always says, 'oooohhh, wooooww!!'  Yes, she loves owls, but she also loves birds.  Her word right after owl was 'bo'...what she calls bird.


Ah, there's my sweet little girl!!  I think she was tired of me snapping pictures, haha.  I said 'smile' and this is what she did.  Then she giggled and of course I missed that picture!


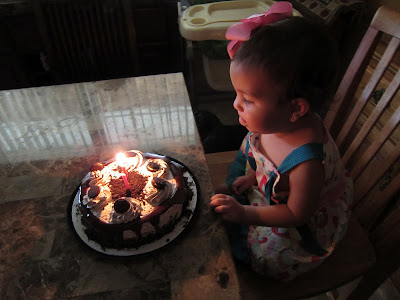
She practiced blowing matches for months before this.  I use matches to heat seal ribbon and I usually just have her blow it out, so she was a pro at blowing the candles out.  In fact, she's sitting next to me right now looking at this picture and blowing!  Silly girl :)


The cake was delicious.  Jaidyn loves Oreos!

I wish time would slow down, just a little. 


Wednesday, June 13, 2012

Graduation!

My baby boy graduated!!!  Pre-school, that is :)  It was so adorable!  The little ones performed a few songs and dances, including the Cha Cha Slide for us that had all the parents cracking up!  I do have that one on video and I just might post it one day.  I can't believe my little boy is going to Kindergarten next school year.  What am I going to do when he goes to school all day?


Here's a picture of the little graduate with Daddy...


...and one with Mommy.

Such a special, wonderful moment for us!

As far as something crafty?  I did make a few custom order dresses for a customer.  We are in Florida and she's a Gator fan :)  Chomp Chomp!!


It's a sweet pillowcase dress with a big ol' bow!  She can root for her favorite team in style!  


Wednesday, June 6, 2012

Fabric Bookmark Tutorial

It's my son's last week of Pre-School!  It's a bittersweet moment for me.  I'm so proud of him and I love watching him grow into an intelligent, curious, healthy, happy little man.  But it seems like only yesterday I was holding a little baby Landen in my arms.  He's needing me less and less as the time passes.


With his graduation approaching, I wanted to make something special for his classmates (luckily there are only ten total in his class).  I thought bookmarks would be perfect for these little scholars.  I've cross-stitched a very special bookmark for Landen before, but it was very time-consuming and there was no way I could spit 10 of them out in a week.  So I decided to create fabric ones.  I'm sure there are a ton of tutorials on sewn bookmarks, but here's how I did it.

Materials

  • main fabric
  • one or two coordinating fabrics (for the backing and the letter...you could use two different fabrics like I did or one coordinating/contrasting fabric)
  • coordinating ribbon
  • heat n bond or similar product
  • iron
  • sewing machine, scissors, thread, etc. 
Instructions

I started with my main fabric.  I bought a few fat quarters for this project.  If you are making one bookmark it doesn't take much fabric at all.  Cut your main fabric and your backing fabric to desired size, remembering to add for seam allowance.  I cut my fabric to 2.5x6".


Then I drew the first letter of each child's name on a piece of Heat n Bond.  I draw on the bumpy side so I don't have to worry about drawing the letter backwards.  I free-handed my letters, but you can certainly use a stencil or print the letter in a font you like to use as a template.  Cut the letter out, making sure you cut inside your pen/pencil marks.  If you use light fabric the pen could show through.

Follow the Heat n Bonds instructions to iron the letter onto the back of one of your coordinating fabrics.  Leaving the backing on, carefully cut the fabric around the letter and iron it onto the middle of your main fabric.  I used a straight stitch to further secure the letter onto my main fabric.


Cut a piece of Heat n Bond out just a hair smaller than your front and back pieces.  I cut mine about 1/8th smaller.  Again, follow manufacturers instructions to iron the Heat n Bond to the main fabric.  


I remove the backing before I stitch the main fabric and the backing fabric together.


With the right sides of your main fabric and your backing fabric facing, stitch around the edge using a 1/4" seam allowance.  Make sure the exposed Heat n Bond side is face down!  If it's face up, the rubber-like texture will get stuck on the presser foot and the fabric won't move.  If it's facing the feed dogs, the teeth of the dogs will grab the 'rubber' and move the fabric.  


 Make sure you leave a gap at the top for turning this inside out.  


For the purple bookmark I used white thread, but you can see the gap better on the boys bookmark where I used black thread.


Clip the corners so that when you turn the bookmark right side out, you will have sharper corners. 


Turn the bookmark with a turning tool.  I don't have a turning tool but I use a tube from a spool of elastic thread that has been used up and a Jelly Roll pen ( with the top on).  Works just fine for me.


This is what you will have.  You want to define those corners before you iron.


I drop a screw driver through the hole at the top and use it to poke the corners out.


Iron the bookmark, following the Heat n Bonds directions.  Do not iron the opening yet.


Fold the top edge inside and finish ironing


It's time to attach the ribbon.  I used a chocolate ribbon to go with the elegant purple bookmark.  fold the ribbon into a V.


Stick the folded edge into the opening at the top of your bookmark.


Top-stitch around the entire bookmark, starting at the opening and making sure you catch the fold of the ribbon.  I stitched about 1/8th" in from the edge. 


Set your stitches.  Be careful with the ribbon as some materials, like my grosgrain will melt under the heat.


For this bookmark, I clipped the ends at an angle.  For some of the others I tied a knot at the end.  Finish it however you want.


Make sure you heat-seal the ribbon ends!


That's it, you're done.  Here are the bookmarks I made for the class.


Please let me know if you make this bookmark and be sure to send me pictures :)